
No-Knead White Bread
An easy and effortless bread that you can bake at home. This no-knead bread has got wonderful texture, just look at those air pockets. Read below to learn how to make this rustic white bread with just four ingredients.
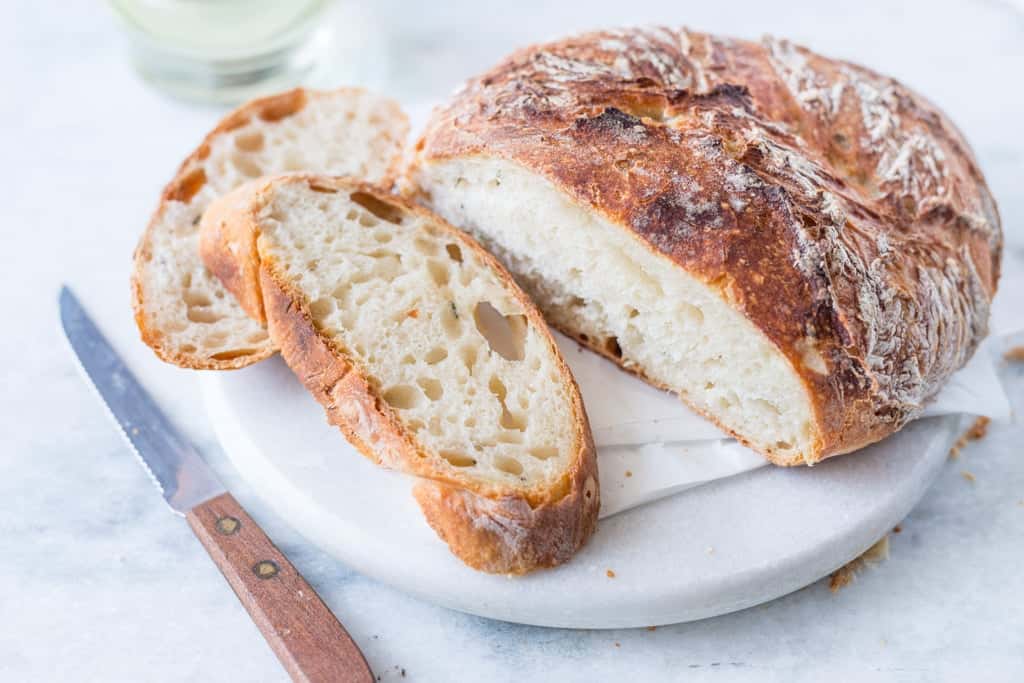
I am sure you would have already scrolled through the images and must be wondering how a No-knead bread can have such a fabulous texture.
Flavours In Your Inbox
Subscribe for recipes straight to your inbox
Believe me or not, this rustic white bread that you are seeing is No-knead and I have spent hardly 5 minutes to put everything together.
No dirtying your hands, no muscle work. But you need to have loads of patience. And when you see freshly baked bread with a lovely crust and a chewy texture, all your waiting would seem worth.
It’s not that I don’t love kneading bread dough. I absolutely love doing that. Bread from my archive Strawberry Focaccia, Turkish Lamb Pide, ARTOS all of these bread needed a good amount of kneading.
But there are times when you are really in a mood to have some freshly baked bread but don’t want to sweat to bake a bread, these kinds of bread come to your rescue.
What is No-knead bread?
This is a very old method of baking bread and predates as much as flour itself. Conventional and popular bread baking involves the procedure of kneading bread. Kneading bread helps in developing the gluten in the bread and that gives bread its texture.
To accomplish the same development of gluten strands, an alternative is to give the dough a lot of time and hydration. Leaving doughs overnight (preferably, allowing till 16 hours) and making a wet dough helps in the natural building of gluten.
No-knead bread thus involves less physical work due to lack of kneading but requires patience as the dough should be allowed to rest much longer.

Ingredients
For such amazing texture (my heart knew boundless joy 🙂 ), this recipe needs only a few ingredients
- Instant dry yeast
- All-purpose flour
- Salt
- Water
- Sugar
The dough is quite wet here. Even the amount of yeast used is quite less. Because of long resting hours, the dough rises enough and also develops good flavor. You might find the dough quite stretchy, this is because the flour gets enough time to absorb the liquid.
If you find the dough is not stretchy enough then the dough needs more hydration.
Equipment to use
- Dutch Oven
- Casserole Dish
Use at least a 4 qt oven for this so the bread can rise and have enough space for all the steam that gets built up. The steam is essential to get a crispy and hard crust.
A dutch oven is preferred over others because of its weight. It holds the heat well for the bread to bake. It also has a heavy lift which does not let steam escape.

How long to rest the dough?
After resting the dough overnight, the dough would appear bubbly but would have flattened at the top (which is normal). the dough needs to be handled with well-floured hands.
Though you might be tempted to start shaping it after 6-8 hours, I would recommend leaving this overnight. The dough needs time for the yeast to do its magic and build the flavor and lightness, characteristics of good bread.
Tips to shape the dough
If you find it difficult in shaping the dough, Keep the dough in the refrigerator for a couple of hours. It is comparatively easy to work with refrigerated dough.
When the dough is still cold, shape the dough into a loaf and let it rest covered on a well-floured surface till it comes to room temperature.
I haven’t tried the refrigeration technique for this particular recipe but this technique is applicable for most Artisan bread. So if you are giving it a try, I would love to hear about your experience.

To serve with
I prepared some bruschetta with roasted tomatoes, fresh basil leaf, buffalo Mozzarella cheese, and drizzled with EVOO.
Shoot me, with any questions you have while baking this bread. I will try my best to answer 🙂

No-Knead Bread
Equipment
Ingredients
- 3 cups All purpose flour
- 1.5 tspns Salt
- ½ tspns Active dry yeast
- 1 ½ cups water Luke warm
- ½ tspn sugar (optional)
For rosemary and garlic flavour
- 1 tbsp rosemary Fresh
- 2 – 3 pods garlic Roasted
Instructions
- In a large bowl stir together flour, salt and yeast. if adding rosemary, slightly crush it and add. Add crushed garlic (if using). Add water and using a spoon mix well.
- The dough will be wet and shaggy .Don’t over work the dough. The less you work with it, more fluffy and soft the bread will be.
- Cover and let the container be on kitchen counter for 8-12 hours. (I prefer doing it overnight). The dough will rise and look bubbly at the surface.
- When ready to bake, Preheat the oven to 220-degree celsius. Place an oven proof baking dish covered with a lid (Dutch Oven or any heavy bottom) for about 20 minutes.
- While the dish is heating up, with floured hands remove the dough from the container and place on a well-floured surface. Shape it to a loaf.
- At the end of the heating period, carefully remove the dish. If you want to be extra careful,slide in a piece of parchment paper/or brush with oil to prevent the bread from sticking.
- Carefully slide in the dough ball. Cover the lid and bake for 30 minutes covered.Then remove lid and bake for 10-15 minutes / till you get a golden brown crust (Which ever is earliest) .
- Remove and let the loaf come to room temperature.


Great recipe. Don’t do it in a cold kitchen, though. Lol.
Also, for safety, to put the bread in the hot dutch oven, best technique is cut a piece of parchment paper about the size of a cookie sheet, place your dough ball in the middle of the paper, drop the dough ball into the cold dutch oven using the ends of the paper as handles to hold it, take that out and then put your dutch oven in to preheat. When ready, grab the ends of that parchment paper and drop the dough into the dutch oven using the paper handles again. Quickest, easiest way to get the dough into the hot dutch oven without getting burned. Bonus- you needed to line it with something anyway.
Thank you once again. Would definitely try your other recipes
So I did bake my very first rustic bread. Although not worthy of a picture, I would say it was a good first attempt as it was edible :). I would definitely try it again.@ Subhasmitha, the bread was kind of hollow from within. What could be the reason
Thanks Subhasmitha. Will be baking over the week.Will let you know how it turns out 🙂
@priya Thank you very much..
@Meena Thank you so much.. I hear you. even the aroma of freshly baked bread enlightens your day.. Thank you for stopping by.
@Recipes Framed Sree.. thank you so much. Cranberry is one of my favourite add-ons in cakes and bread. It goes well with orange too. you are going to love it for sure.Can’t wait to see the bread.
@indu Thank you.. yes here all the trick lies in long resting time and good level of hydration. Many recipes with has slow and long rising period calls for very less yeast.
@Ishita Thank you for stopping by.. Now coming to your queries 1. Putting the lid on ,helps in building steam which gives a good crust. You can use two cake pans of same size, one of that will act as a lid. 2. It’s actually a good practice to proof the yeast(I skipped that this time) . So to be double sure you can mix half of the water and yeast with a pinch of sugar. Let it bubble. then follow rest of the procedure… It’s absolutely ok to ask question 🙂 . I would be happy to answer till you are clear with your doubts.
Can it be baked without putting a lid on it?do mix the the dry yeast with the flour as it? Doesn’t it have to be mixed in warm water first?sorry I am new to baking bread hence these questions
Gorgeous bread and beautiful clicks!
you got the texture with 1/2 teaspoon yeast and no kneading? This is an awesome recipe!
Love the beautiful looking bread in the white bg .No knead and bruschetta with that one oh how I love such days!
Love baking breads.! And if it is a no-knead one. GREAT! :). I saw your post on FB and that inspired me to bake a cranberry no-knead bread.