
No-Knead Foccacia
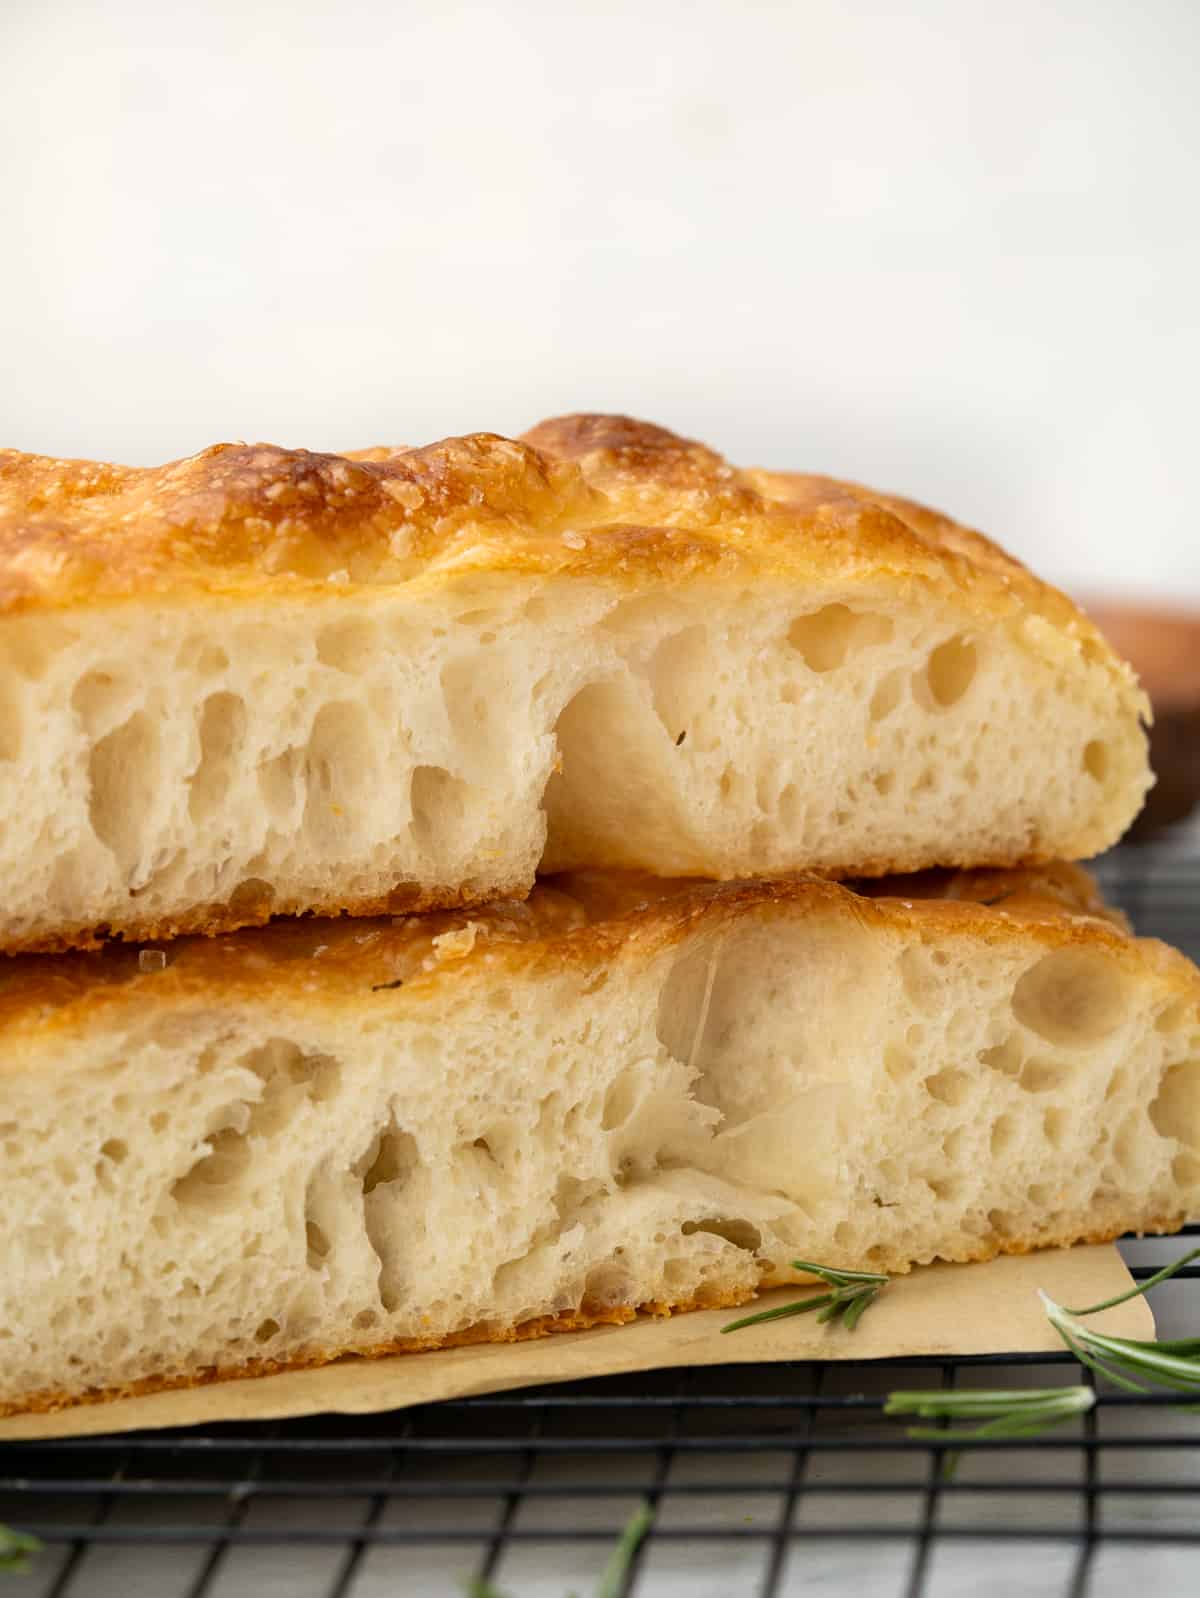
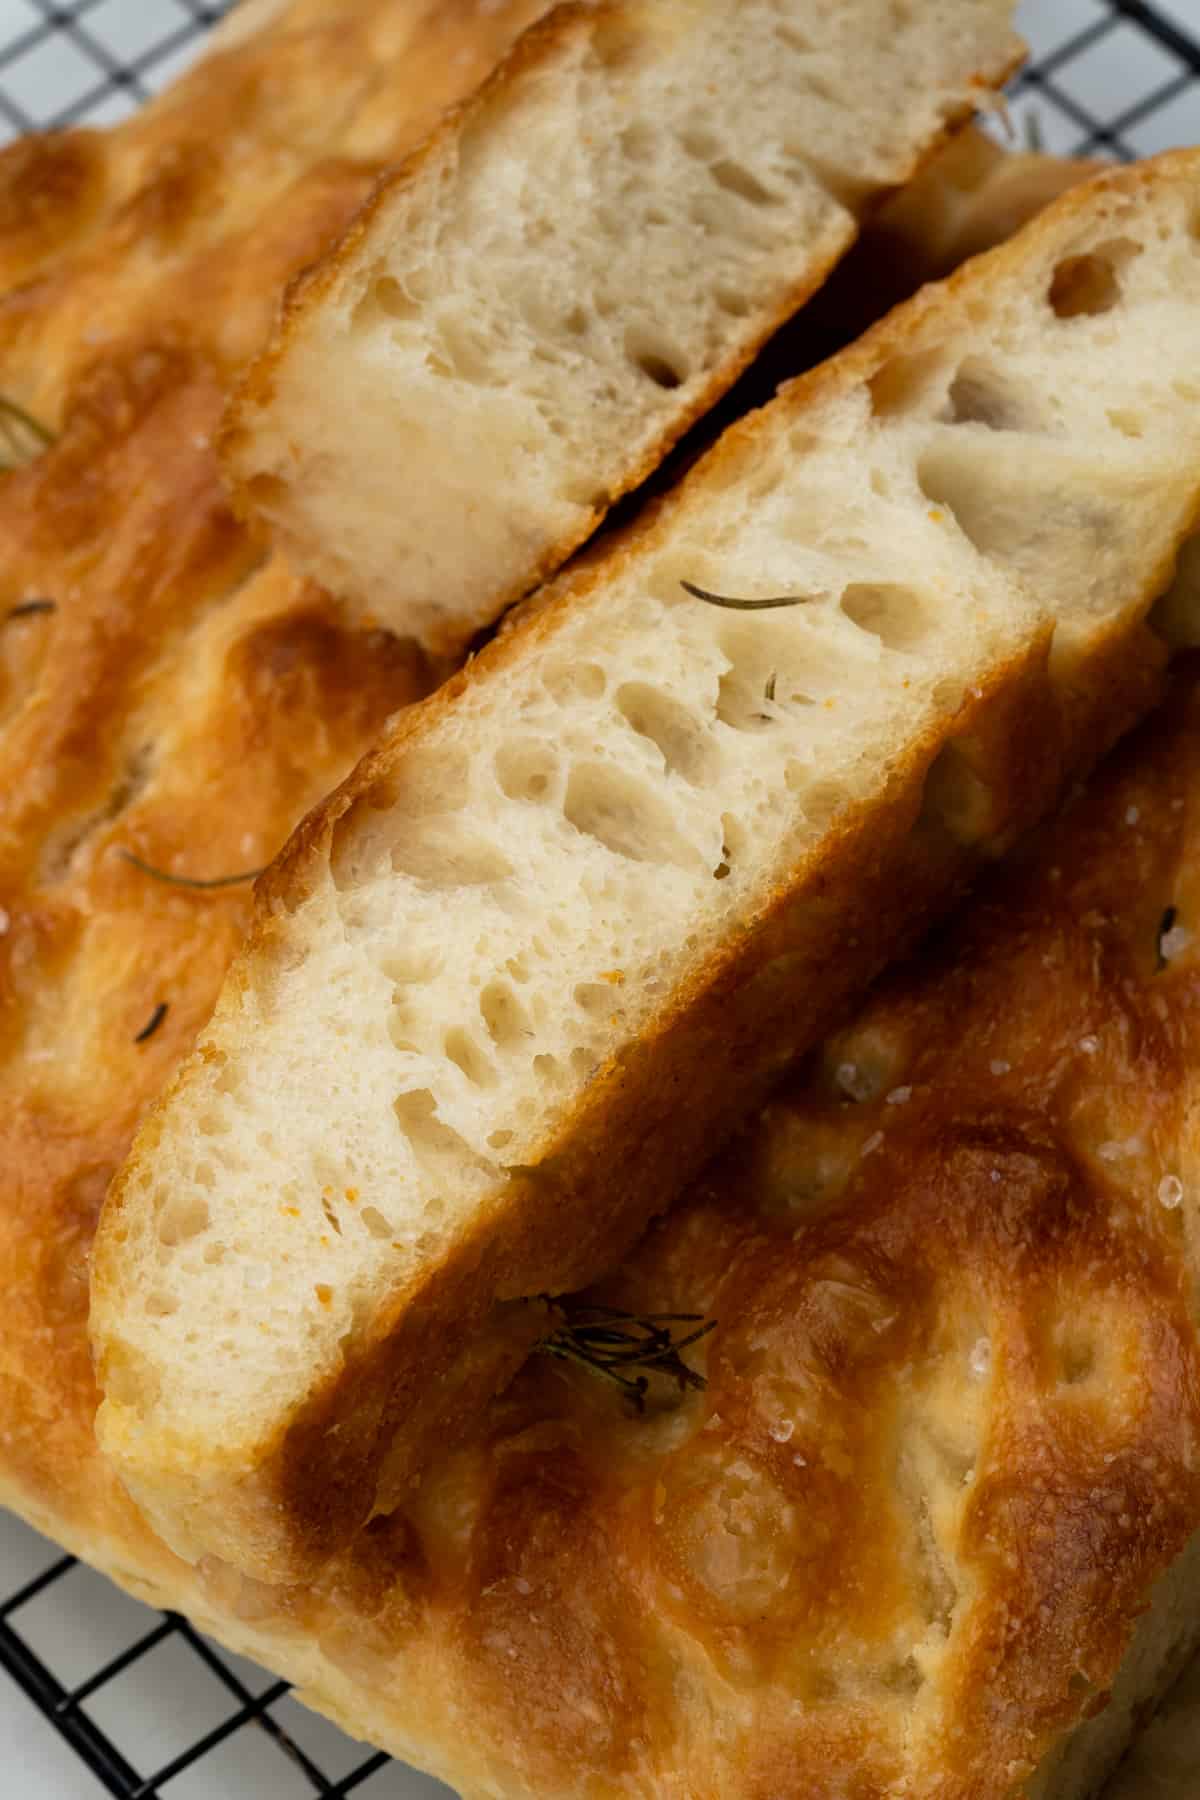
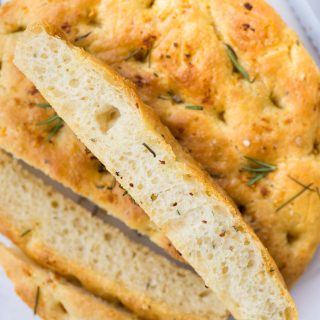
This No-knead focaccia has a crisp crust, and a soft airy interior, with the characteristic big bubbles. The best part? Even a baking novice can master this recipe. Though the overnight long cold rest of the dough makes it extra pillowy, you can make this bread on the same day in 3 hours.
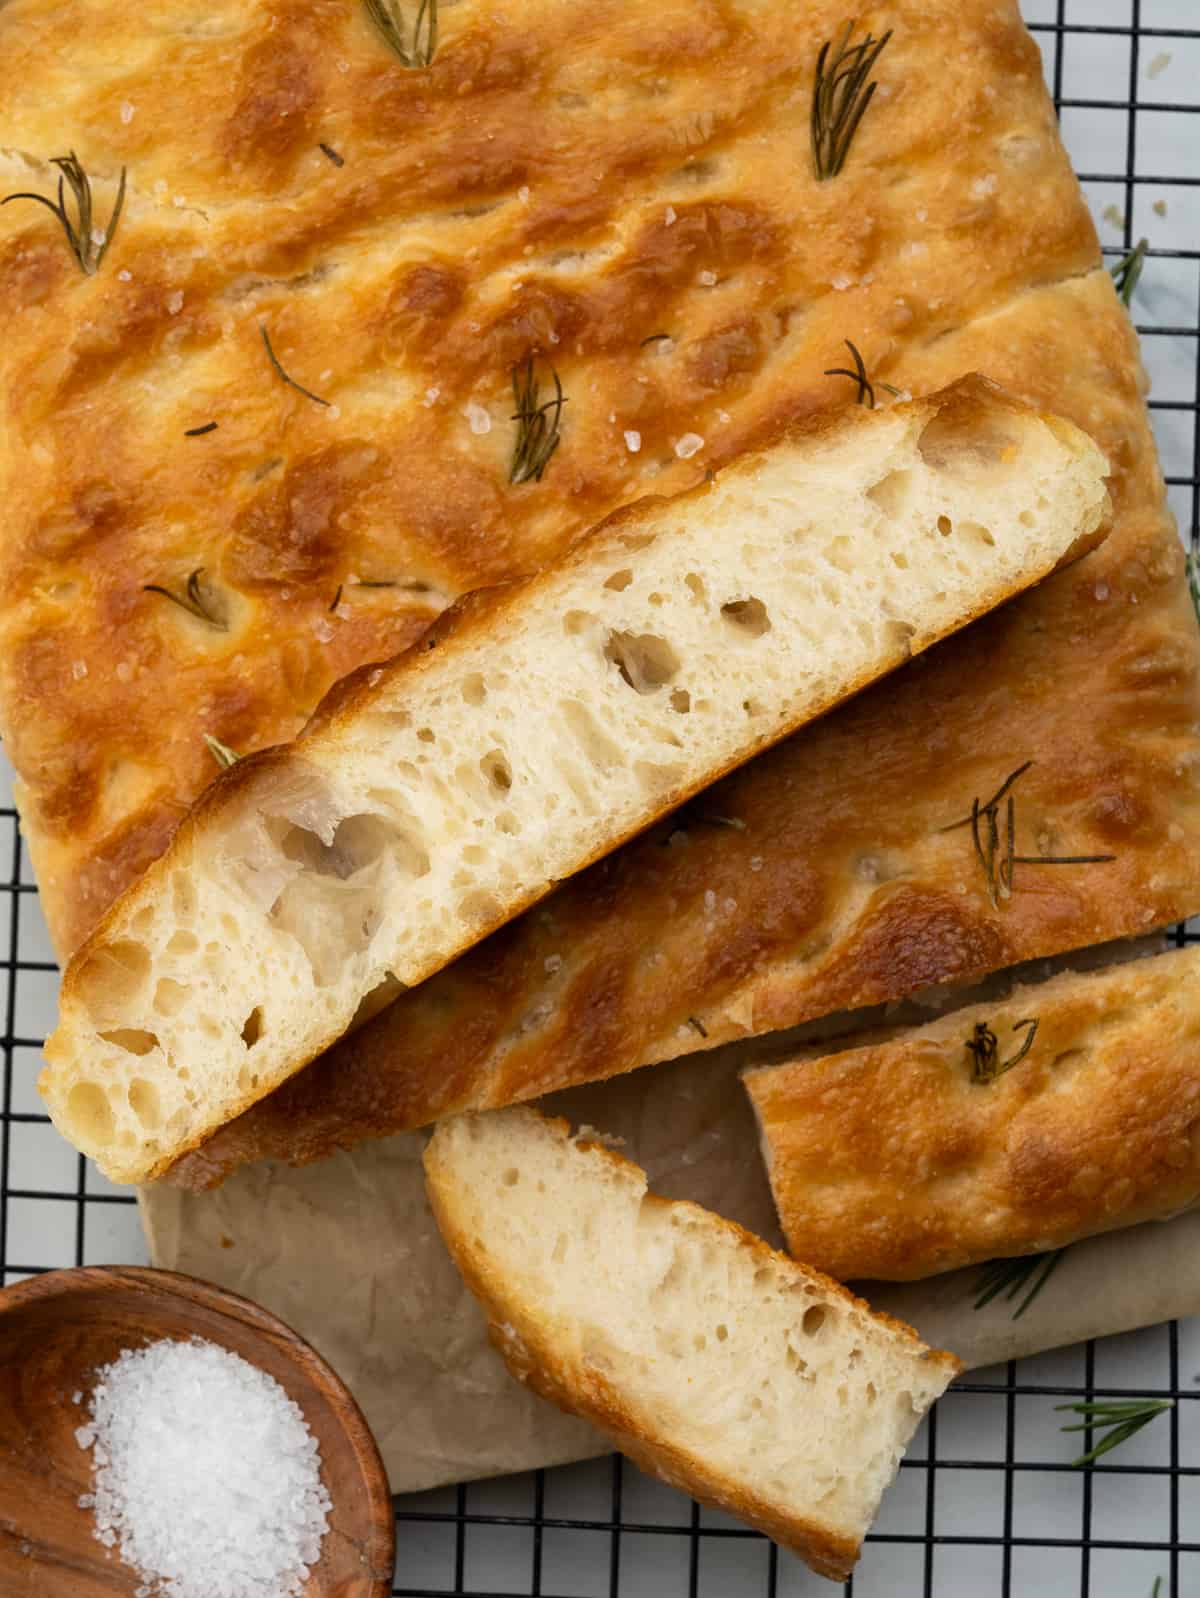
Making Focaccia at home can’t be easier than this. This popular Italian flat bread is one of those beginner-friendly bread recipe that you keep coming back to . It has got a perfect crispy golden crust. On the inside, it is soft, airy (thanks to the high hydration dough) and has a chewiness to it. If baking bread has been intimidating to you or you love baking fresh bread, then this bread is for you. Just 5 basic ingredients, zero to little effort and you will be amazed at how flavourful this bread is.
Why should you make this Focaccia Bread?
I have enough reasons to convince you that this is ‘THE’ Focaccia recipe you need to follow.
- It requires no special equipment such as a stand mixer.
- Zero skill required. It is a no-knead bread. You don’t have to shape the bread, just spread it on a rectangular tray and bake.
- The recipe is almost hands-free except a few stretches and folds.
- Flexible timeline – you can bake with overnight rest time in the refrigerator or the same day in about 3- 3.5 hours.
How is this recipe different from others?
There are numerous recipes out there but this one stands out for a couple of reasons
- Because it is a no-knead bread, the right water-to-flour ratio is crucial. The high-hydration dough helps in keeping focaccia moist. This has just the right ratio making it a foolproof recipe.
- The long overnight rise in the refrigerator not only hydrates the flour, also helps in developing flavour.
- Before resting the dough, a couple of stretch and folds helps to develop gluten and strengthen the dough. This process has a similar effect to kneading of regular bread dough.
- Lastly, unique to this recipe is while adding the flour to the water, add it in 2 parts. After adding 3/4th of the flour, beat the mixture with a wooden spoon for 15-20 minutes, like you beat eggs, This step again helps to develop gluten in the dough.
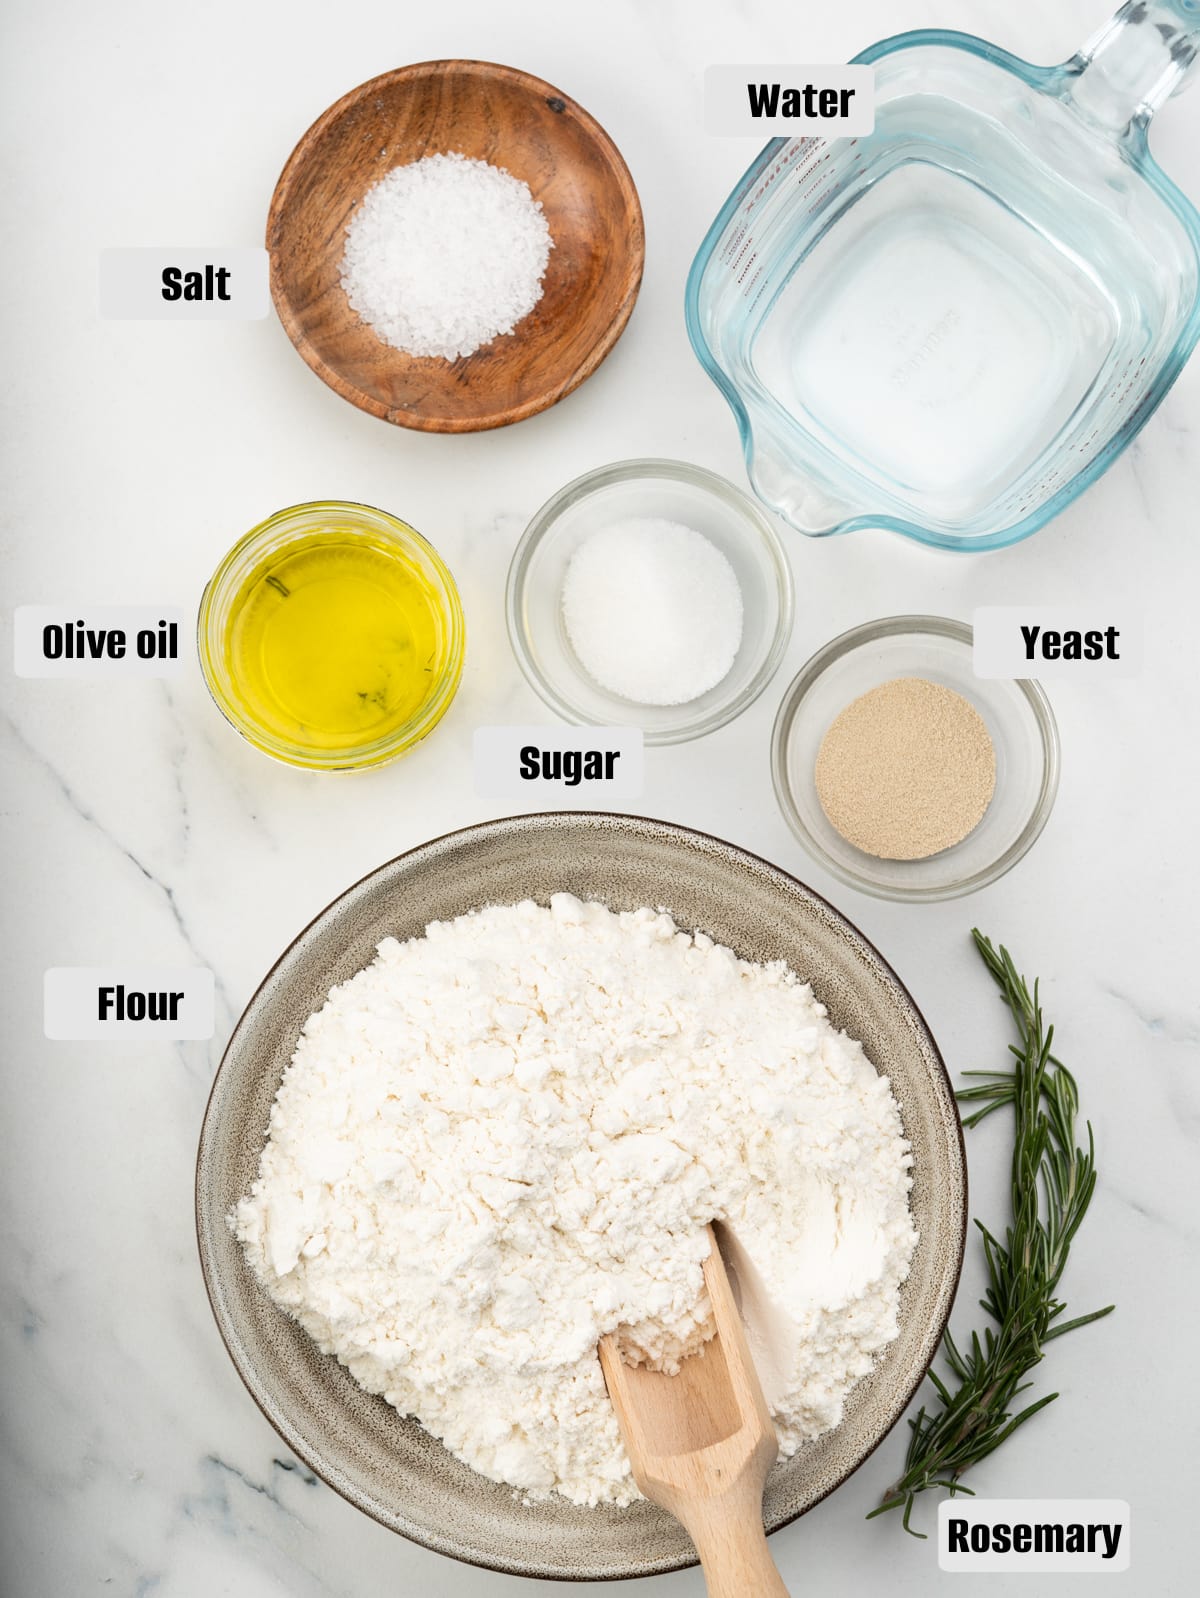
Ingredients you need
- Flour- I would suggest bread flour for this no-knead recipe. All-purpose flour will also work with a good but slightly different result.
- Yeast – To save time, I opted for instant yeast in this recipe. Unlike active dry yeast, instant yeast doesn’t require a separate activation step. It mixes right in with the dry ingredients for a streamlined process.
- Salt- It is important to season the bread well, else no matter how well the bread looks, it will taste bland. I have used Diamond Crystal Kosher salt. To sprinkle on top, use flaky sea salt, avoid using fine table salt.
- Olive Oil- There is generous use of Olive oil here. It is important to use really good quality olive oil for the best flavor.
- Water- Regular tap water that is lukewarm.
- Sugar- Food for yeast. Honey is a good alternative.
- Rosemary – I have kept the topping simple and classic. Just sea salt flakes and fresh rosemary sprigs. I will share about other topping options later in the post.
Step by step
Measure all the ingredients before you begin with the recipe.
Activate Yeast
Instant yeast doesn’t need to be activated before use. But to be double sure and avoid any surprises later, I activate the yeast first. It has happened to me in the past, that the yeast was dead and I figured that out too late in the process. If you are sure about it, then skip the process and mix flour, salt, sugar, and yeast together.
Mix in olive oil, salt and flour
When the yeast looks frothy, add salt, Olive oil, and 3/4th of the flour. Use a wooden spoon to mix everything. The mixture will a bit runny and like pancake batter.
At this stage beat the dough with the wooden spoon like you beat eggs or stir it vigorously in a circular motion. This step is optional but when done helps in gluten formation. Then add the remaining flour and mix until you get a wet shaggy dough. Cover and let it rest for 10 minutes for the flour to hydrate.
Stretch and Fold
After resting the dough we will do the first round of stretch and fold. Stretch and fold is a technique that’s used in sourdough bread baking to develop gluten and build resistance. It thus helps in shaping the boule. In this case, it improves the gluten in the dough.
Flavours In Your Inbox
Subscribe for recipes straight to your inbox
Slightly wet your hands to prevent the dough from sticking. Take a section of the dough, stretch it up, and fold it over on itself. You then rotate the bowl 90° and do it again, then repeat twice more. ( watch the attached video to get a clear idea of how to do it).
We will be doing 2 rounds of stretch and fold, 20 minutes apart. In between the two rounds allow the gluten to rest. By the end of this step, you will notice the dough is much more supple and easy to handle.
Overnight proofing dough
After 2nd stretch and fold, bring together the dough by scraping the bowl using a spatula. Drizzle about 1 tablespoon of oil and coat the dough well. Tightly cover the bowl with cling film ( a double layer of film just to make sure it’s covered well) and let it rest in the refrigerator for at least 6 hours for up to 12 hours. At the end of this step, the dough would be doubled in size.
Transfer and shape the dough
Punch the dough to flatten it. Transfer it to a lined and greased pan. Roughly shape the chilled dough to a rectangle by tucking in the sides.
Note – Chilled dough might feel a little tight but it will be easy to handle once comes to room temperature.
2nd proof at room temperature
Drizzle 1 tablespoon of oil, spread it well, and loosely cover with a cling wrap. Let it rise for at least 1 hour – 1.5 hours (cold dough takes time to rise) until it’s almost doubled in size and looks fluffy.
Final shaping and toppings
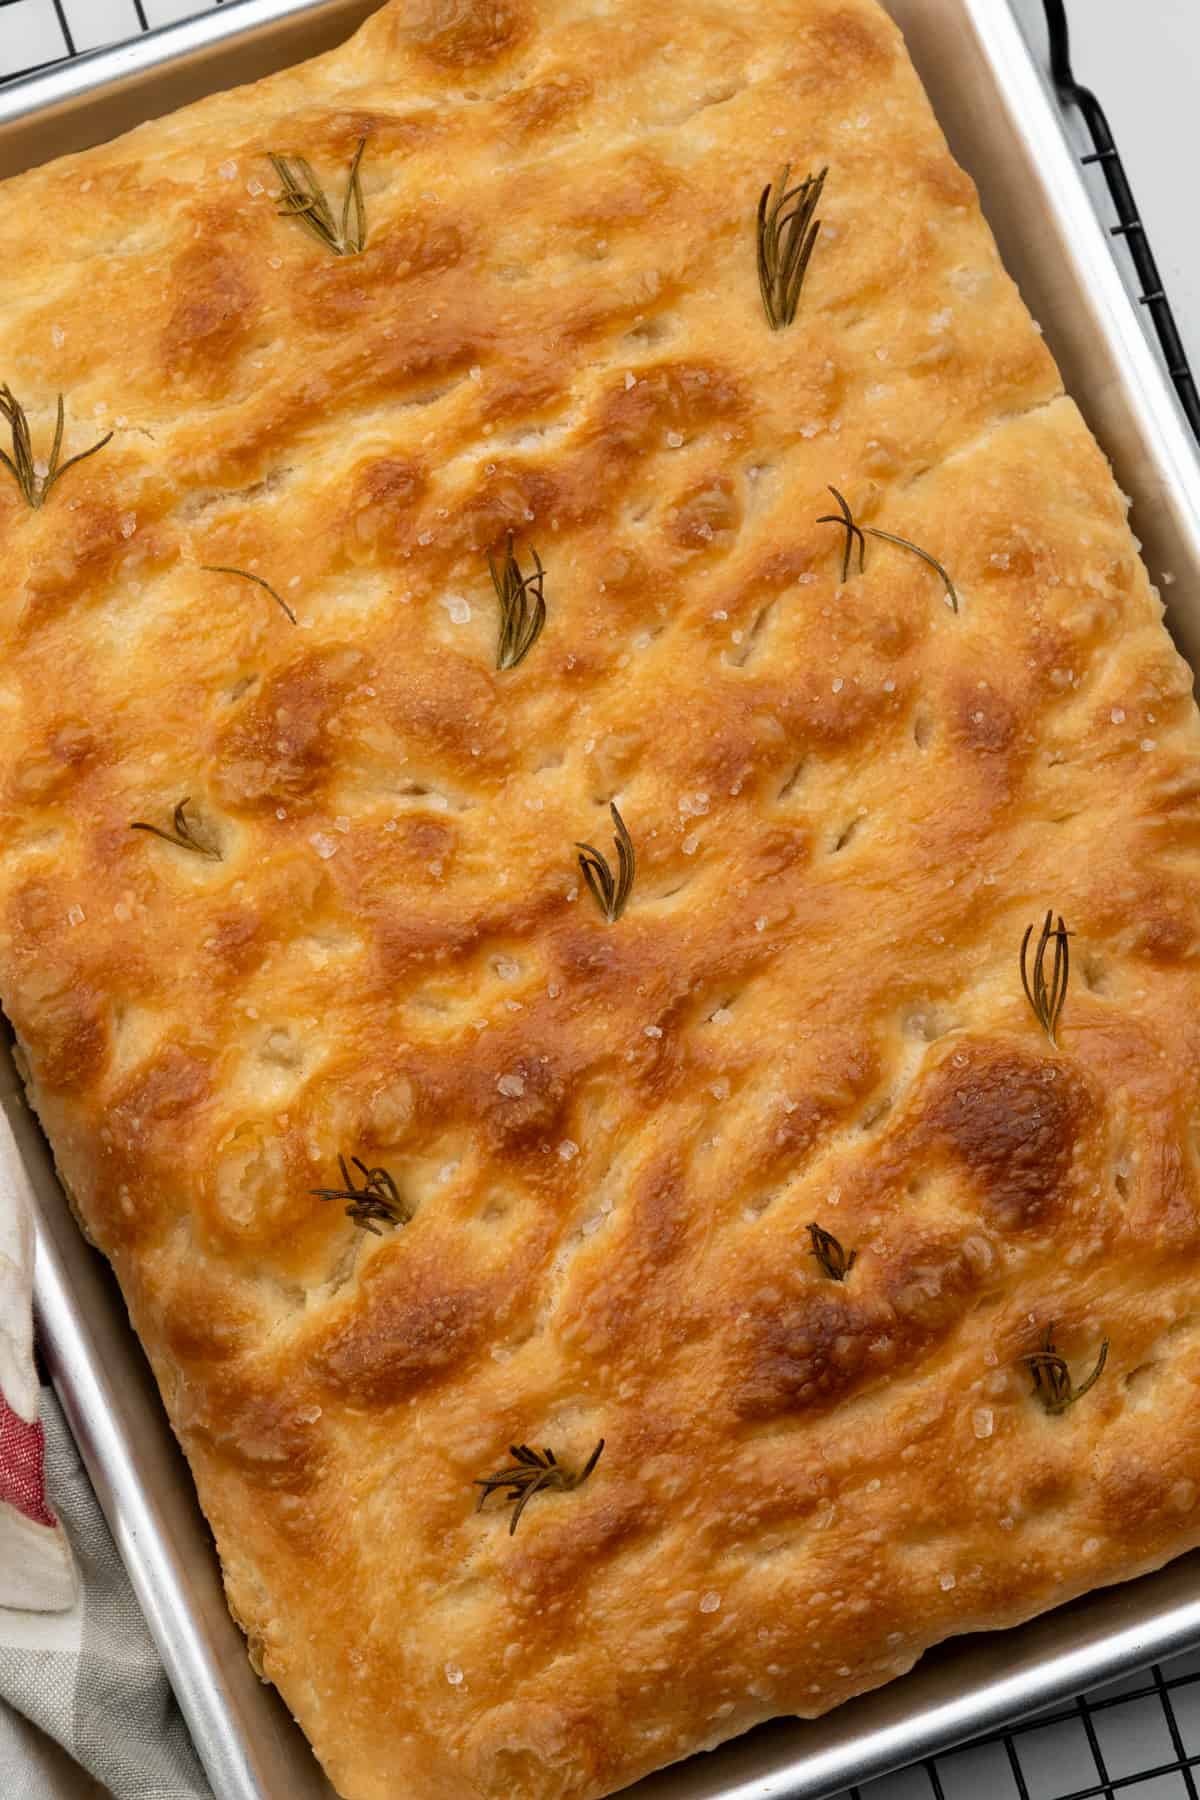
Gently stretch the proofed dough toward the corner of the baking tray, to give it the shape of a rectangle. Drizzle olive oil generously all over. Now is the fun part, making dimples using the fingertips of both hands. Arrange the topping. I have used rosemary sprigs. Sprinkle flakey sea salt.
Bake
Bake the focaccia for about 30-35 minutes, or until it’s beautifully golden brown and has begun to shrink back slightly from the sides of the pan. Take it out of the oven and let it cool for just a few minutes directly in the pan. Then, transfer it to a wire rack to finish cooling completely. This will prevent the bottom from getting soggy.
Bake It On The Same Day
Though overnight slow-proofing gives the best flavor and texture, in case of press of time you can bake the same day with amazing results. After the second fold and stretch, let the dough rest and rise until doubled in a warm place for about 1 hour.
Then transfer the dough to the tray and roughly shape it into a rectangle. Cover and let the dough rise in the prepared pan for about 30-40 minutes. Unlike refrigerated dough, room-temperature dough takes less time during the second rise. Then proceed with the same steps as overnight dough.
Tips For Foolproof no knead Focaccia
- The saltiness of different kinds of salt varies, so if substituting with any other salt then always weigh by weight, not by volume. I have used 11 grams( 1 tablespoon) of diamond crystal salt.
- Use a metal baking pan for a crispy crust. Glass or other materials don’t hold heat that well.
- Despite using a non-stick baking tray, I line the tray with parchment paper and drizzle with olive oil to make it double sure the bread doesn’t stick to the tray.
- Once the bread is out of the oven, take out the bread from the tray( its easy if you have lined the tray) and cool it on a wired rack. If kept longer in the baking tray, the bottom will get soggy because of steam buildup.
- I prefer baking at the lower third of the oven, for a crispy bottom. In the last 5 minutes move to the top third for a golden color top.
Frequently Asked Questions?
Bread flour has a higher protein content (12%-14%) compared to all-purpose flour. This extra protein translates to more gluten development, which creates a stretchy dough and ultimately a chewier crumb. All-purpose flour on the other hand is low in protein content, so the texture will be a bit different. But it will work.
For this recipe, a 9X13 inch baking pan yields focaccia of perfect thickness. However, you can divide the dough between 2 8-inch or 9-inch square tin. A quarter baking sheet will also work.
Yeast loses its strength over time, even if it is in the refrigerator. An hour or two more in the refrigerator is not going to hurt. I have proofed the dough for up to 15 hours and then went ahead with the room temperature second rise. And the result was amazing.
Use an equal amount of Active dry yeast. Make sure you proof it before using it
The dough consistency is wet and shaggy. Depending on the flour protein content or humidity you might have to adjust the water quantity. Always add 1 tablespoon of flour/water at a time to adjust the dough.
Get creative (Different topping ideas)
I love the classic Rosemary sea salt topping. When it comes to Focaccia toppings, the possibilities are endless. But it’s best to keep it simple with two or three choices to avoid overwhelming the flavors. Check out my Strawberry rosemary Focaccia as an interesting variation.
- Rosemary and garlic– Cut garlic into thick slices. Press it gently into the dough.
- Tomato – Seasonal cherry or grape tomatoes cut into halves and pressed into the dough. Sundired tomatoes are another great option.
- Onion
- Flavored Olive oil
- Juicy Olives – cut into half and press gently into the dough.
- Onion- Slice the onions into thick slices. The slices should be at least ¼ inch thick (7mm). If cut too thin they will burn.
Where (/how) to use Focaccia Bread?
Every time I bake focaccia, I can’t stop myself from breaking a big chunk and eating it while still warm.
You can make an Italian Focaccia sandwich. Split the bread open horizontally. Two of my favorite toppings are Basil Pesto + summer tomato + burrata and other is prosciutto di parma, fresh buffalo mozzarella, and fresh Italian basil.
Pairs beautifully with warm soup like this classic tomato soup, creamy cauliflower potato soup , Spinach soup , Instant pot creamy vegetable soup
If you are looking for another easy bread recipe, then do give this no-knead bread a try.

No Knead Focaccia
Ingredients
- 500 grams Bread flour
- 1 + ¾ cup water luke warm
- 11 grams Diamond crystal salt (ref not 1)
- 1 tablespoon sugar
- 2 teaspoon Instant dry yeast
- 1 Tablespoon Olive Oil to add to the dough
- 2-3 sprig rosemary for topping
- flaky sea salt for topping
Instructions
Making Dough
- Whisk together flour, yeast, salt and sugar. In another large mixing bowl add lukewarm water and olive oil.
- Add 3/4th of the dry mixture to water and mix. The mixture will resemble pancake batter. Mix vigorously using a wooden spoon 10-12 times ( Just like how you beat eggs). (Ref note 2)
- Add rest of the dry mixture to the bowl. Mix until there is no dry patch of flour. The dough will look wet and sticky. Cover with a kitchen towel and rest for 10 minutes for the flour to hydrate.
Stretch & Fold
- Stretch & fold 1 – After 10 minutes of rest, slightly wet your hands. Then take a section of the dough from the farthest side of you, stretch, and fold bringing the dough to the opposite side of the bowl (towards you). Turn the bowl 90 degrees and repeat the same step for rest 3 sides. (Watch the videos @00 .55 onwards to get a better idea of how to do stretch and fold)
- Cover the dough with a kitchen towel and let it rest for at least 20- 25 minutes allowing the gluten to relax.
- At the end of 20 minutes, perform another round of stretch and fold. By now you would notice the dough looks smooth and easier to handle.
For Same Day Baking
- If you have time and can proof the dough overnight, then skip to the next section. For same-day baking, after second stretch and fold, bring together the dough by using a spatula and scraping any bits of dough stuck to the bowl. Drizzle 1- 1.5 tablespoon soil and rub to cover the dough. Use a plastic wrap or double layer of cling wrap and cover the bowl airtight.
- Let the dough rest in a warm corner for 1 hour, until the dough has risen double its size and looks puffy. Then skip to the step. ' 2nd Proofing'
Overnight Proofing in refregirator
- After 2nd stretch and fold, bring together the dough by using a spatula and scraping any bits of dough stuck to the bowl. Drizzle 1- 1.5 tablespoon soil and rub to cover the dough. Use a plastic wrap or double layer of cling wrap and cover the bowl airtight. (ref note 3)
- Keep it in the refrigerator for at least 6 hours upto 12-14 hours.
2nd Proofing( room temperature)
- When you decide to bake, take out the dough. It would have risen to double its size. Punch the dough to flatten and release trapped gas.
- Prepare a 9"x13" non-stick metal pan or a 13×18-inch rimmed sheet pan by lining it with parchment paper. Drizzle about 2-3 tablespoons of olive oil and spread it well.
- Transfer the dough to the prepared pan. Turn it to fully coat it in the oil. Make a rough rectangular shape by tucking in the edges. The cold dough might feel a little stiff and difficult to handle, that's normal.
- Loosely cover shaped dough with a cling wrap and let the dough rise to double its size for about 1.5 – 2 hours depending on how warm your kitchen is. ( if you are baking the bread on same day, the dough will take about 35-45 minutes to get doubled as compared to cold refrigerated dough).
Shape and Topping
- 30 minutes before the end of final rise, preheat the oven to 450°f / 230°c (conventional,not fan) or 400°F (200°C) with the fan.
- At the end of rising time, the dough would look puffy. Drizzle 3-4 tablespoons of olive oil all over the dough. Rub your fingertips with oil.
- Using fingertips press through the dough to make dimples and also gently stretch the dough towards the edge of the pan as you dimple to allow the dough to fill.
- Sprinkle flaky sea salt, rosemary sprigs for topping.
Bake
- Transfer to the oven and bake for 25 to 30 minutes, or until golden brown on the surface and pulling away from the sides of the pan.
- It is baked when the bread is pulled away from the edges.
- Use a knife to release the dough from the edges if required then transfer the bread onto a wired rack to cool. (If you have lined the tray with parchment paper then its easy to remove the bread from the pan and you can do it as soon as the bread is out of the oven. If its not lined, you might have to wait for 5-8 minutes before transferring the dough.)
- Let it cool down completely before cutting.
Notes
- Measure salt by weight instead of volume.
- Beating the wet dough with a spoon helps creating gluten. This step is optional and you can skip this.
- I would avoid using a kitchen towel to cover the bowl while refrigerating as it will let cold air into the bowl and dry out the dough surface creating a crust.


Thank you Indu.
In love with the pics!